
This article contains instructions on how to manually connect Outlook 2010/2013 to your Exchange 2007/2010/2013 mailbox.
Notes:
We recommend performing a clean install of Outlook before configuring it to connect to your Exchange server. If you already have a previous version of Outlook installed on your PC, please uninstall this version (from Control Panel > Add/Remove Programs), reboot your PC, and then install Outlook 2010/2013. After performing a clean install of Outlook 2010/2013, you're now ready to configure it to connect to your Exchange mailbox. Office 2013 programs are not supported with any OS older than Windows 7.
Please note that the datacentre has discontinued support of Outlook 2010/2013 with Exchange 2003 accounts.
You will not be able to install Outlook 2010 or any other Office 2010 product if an Office 2003 product is installed on the same computer.Your OS should be SP1 with all Windows updates for Outlook 2010 to successfully connect to Exchange 2013 mailbox.
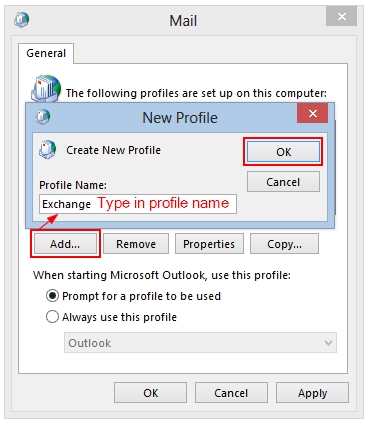
To create a profile:
Tip: During the following procedures, if you see a popup window that asks you to log in, click Cancel. You may get an error message or another login request, but just click Cancel again.
1. Go to your Outlook mail settings from Start > Control Panel > Mail > Show Profiles > Add.
If you cannot locate the Mail icon in Windows Control Panel, turn on Classic View (click Classic View on the left side of the Control Panel window).
2. Specify your Profile Name and click OK.
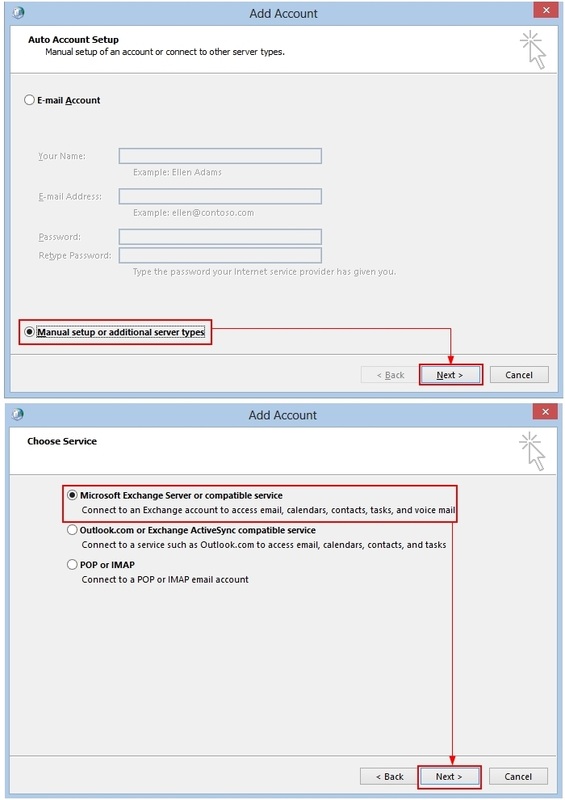
3. On the Auto Account Setup page, select Manually configure server settings or additional server types and then click Next.
4. On the Choose Service page, select Microsoft Exchange or compatible service and click Next.
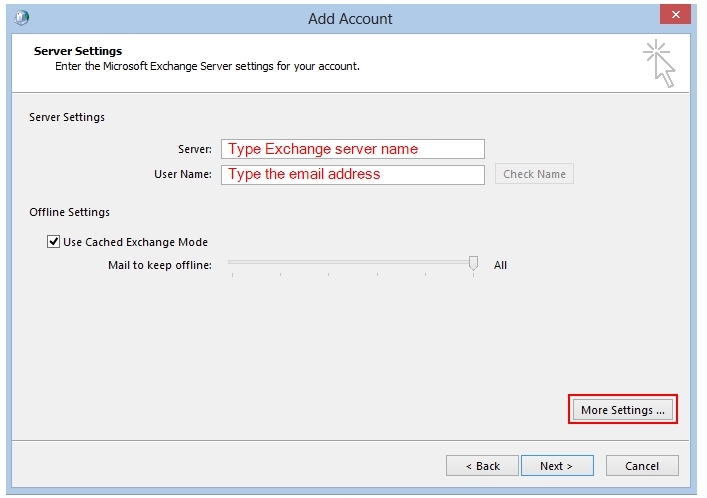
5. On the Ser ver Settings page:
- Specify your Server FQDN as Exchange server name
- Type your Exchange Mailbox Username (email address).
- For the Offline use option, make sure that Use Cached Exchange Mode is selected.
- Click the More Settings button and switch to Connection tab.
- In Outlook 2013 you can specify the time period for which email items will be kept offline.
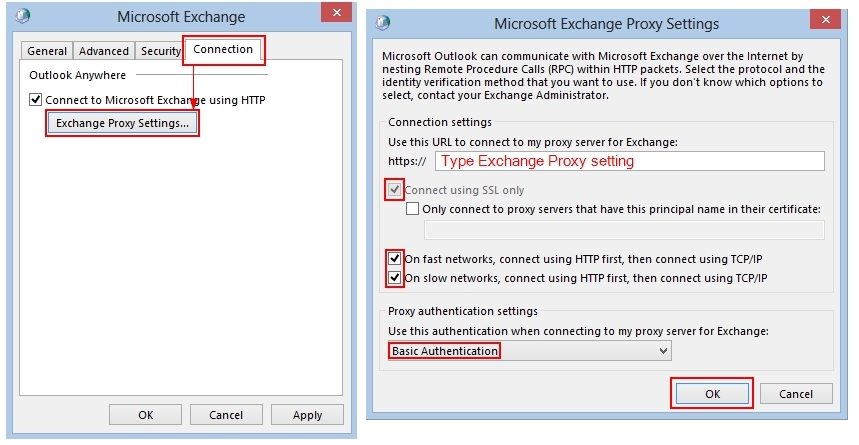
6. Select the Connect to Microsoft Exchange using HTTP option and click the Exchange Proxy Settings button.
-Specify Exchange proxy settings.
-Type the URL for your proxy server in the Use this URL to connect to my proxy server for Exchange field.
-Make sure that both the options On fast networks and On slow networks are checked.
-In the Proxy authentication settings box, choose Basic Authentication.
7. If you want to have Outlook save your password, read the Knowledge Base article on How do I save my Outlook Password? for more information.
8. Click OK, then Apply, then OK to return to the Add New Account window. Click Check Name.
If you have set everything up properly, you will see a window requesting authentication.
9. Enter the complete primary email address as the username, and enter the password for the mailbox.
If you have entered the username and password correctly, the username will now be underlined, and the entry in the Microsoft Exchange Server field will also be underlined.
Note: If your server is Exchange 2013 the server name will get underlined and will resolve into a name that looks like 20250514-db52-4776-b627-0edf7599bbe4@YourDomainName.com. Such a conversion is expected behaviour for Exchange 2013 mailboxes.
10. Click Next, then Finish, then OK to save changes.
11. Start Outlook and log in, using the same credentials as in step 9.